
Dual Motor Controller Module L298N
L298N Dual Motor Controller Module 2A and Arduino.
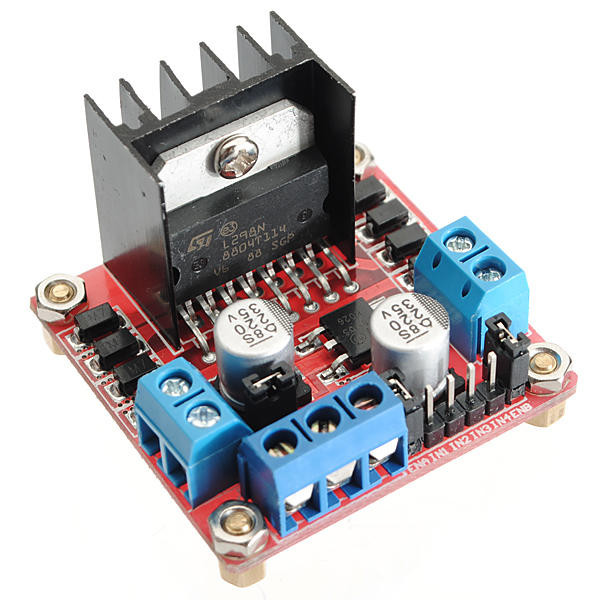
In this tutorial we'll explain how to use our L298N H-bridge Dual Motor Controller Module 2A with Arduino. This allows you to control the speed and direction of two DC motors, or control one bipolar stepper motor with ease. The L298N H-bridge module can be used with motors that have a voltage of between 5 and 35V DC.
There is also an onboard 5V regulator, so if your supply voltage is up to 12V you can also source 5V from the board.
These L298 H-bridge dual motor controller modules are inexpensive and available from the Tronixlabs Australia store. Furthermore if you're completely new to the world of Arduino we highly recommend you review a copy of "Arduino Workshop", and if you have questions, ask in our customer forum.
So let's get started!
First we'll run through the connections, then explain how to control DC motors then a stepper motor.
Module pinouts
Consider the following image - match the numbers against the list below the image:
- DC motor 1 "+" or stepper motor A+
- DC motor 1 "-" or stepper motor A-
- 12V jumper - remove this if using a supply voltage greater than 12V DC. This enables power to the onboard 5V regulator
- Connect your motor supply voltage here, maximum of 35V DC. Remove 12V jumper if >12V DC
- GND
- 5V output if 12V jumper in place, ideal for powering your Arduino (etc)
- DC motor 1 enable jumper. Leave this in place when using a stepper motor. Connect to PWM output for DC motor speed control.
- IN1
- IN2
- IN3
- IN4
- DC motor 2 enable jumper. Leave this in place when using a stepper motor. Connect to PWM output for DC motor speed control.
- DC motor 2 "+" or stepper motor B+
- DC motor 2 "-" or stepper motor B-
Controlling DC Motors
To control one or two DC motors is quite easy. First connect each motor to the A and B connections on the L298N module. If you're using two motors for a robot (etc) ensure that the polarity of the motors is the same on both inputs. Otherwise you may need to swap them over when you set both motors to forward and one goes backwards!
Next, connect your power supply - the positive to pin 4 on the module and negative/GND to pin 5. If you supply is up to 12V you can leave in the 12V jumper (point 3 in the image above) and 5V will be available from pin 6 on the module. This can be fed to your Arduino's 5V pin to power it from the motors' power supply. Don't forget to connect Arduino GND to pin 5 on the module as well to complete the circuit.
Now you will need six digital output pins on your Arduino, two of which need to be PWM (pulse-width modulation) pins. PWM pins are denoted by the tilde ("~") next to the pin number, for example:
Finally, connect the Arduino digital output pins to the driver module. In our example we have two DC motors, so digital pins D9, D8, D7 and D6 will be connected to pins IN1, IN2, IN3 and IN4 respectively. Then connect D10 to module pin 7 (remove the jumper first) and D5 to module pin 12 (again, remove the jumper).
The motor direction is controlled by sending a HIGH or LOW signal to the drive for each motor (or channel). For example for motor one, a HIGH to IN1 and a LOW to IN2 will cause it to turn in one direction, and a LOW and HIGH will cause it to turn in the other direction.
However the motors will not turn until a HIGH is set to the enable pin (7 for motor one, 12 for motor two). And they can be turned off with a LOW to the same pin(s). However if you need to control the speed of the motors, the PWM signal from the digital pin connected to the enable pin can take care of it.
This is what we've done with the DC motor demonstration sketch. Two DC motors and an Arduino Uno are connected as described above, along with an external power supply. Then enter and upload the following sketch:


